Tips to Fix AirDrop Not Working Issues in iOS 15, iPadOS 15, and macOS 12
In most cases, you can troubleshoot AirDrop issues on your iOS or macOS device just by resetting the key components like Bluetooth and Wi-Fi and checking off the basics. If that doesn’t rescue you, there are a few reliable but a bit radical solutions that have the knack of resolving AirDrop problems. In this troubleshooting guide, I have mentioned all the possible solutions that can resolve AirDrop’s transfer and visibility issues. So, first off start with the pre-requisites and then move on to the quick tricks. If the instant hacks do not work, only then take on seemingly radical solutions. With that in mind, let’s cut the chase!
What Type of Files Can You Share with AirDrop?
AirDrop supports a variety of formats including photos, videos, contacts, Voice Memos, Map locations, Passbook passes, and more. In a nutshell, you can use it to share anything/everything that shows up on a Share sheet. When sharing large files, make sure to send them one by one. Keep in mind that large files take a bit more time to travel from one device to the other. Therefore, you will need to wait for them a little longer to arrive on your device.
Pre-Requisites for AirDrop
Ensure that the person you’re sharing files with is nearby and within Bluetooth and Wi-Fi range (within 30 feet or 9 meters). Make sure Wi-Fi and Bluetooth are enabled on both devices. If you and the person you want to share content with have iPhone 11,12, or iPhone 13, you can point your iPhone in the direction of the other iPhone to speed up sharing. If the person you are sharing files with is in your contacts, an image with their name will appear in the share sheet. But if they are not in your Contacts, only their name will show up in the share sheet. If a red numbered badge shows up on the AirDrop button, that means there are multiple devices nearby that you can share with. When someone shares any file with you via AirDrop, an alert with a preview will appear on your device. The preview offers you the option to Accept or Decline the shared file. If you Accept the shared file, it will be saved within the same app it was sent from. For instance, videos will be sent in the Photos app, while website links will open in Safari. And if someone shares an app link, it will (you guessed it!) open in App Store so that you can download the app right away. Bear in mind that if you AirDrop something to yourself, like a photo from your iPhone to your iPad/Mac (linked with the same iCloud account), you won’t get an option to Accept or Decline. The shared file will automatically be saved in the relevant app.
Turn Off/On Bluetooth/Wi-Fi
As Bluetooth and Wi-Fi have a key role to play in helping AirDrop work consistently, make sure these important cogs are working well. One of the easiest ways you can fix the inconsistency of Bluetooth and Wi-Fi is by turning them off/on.
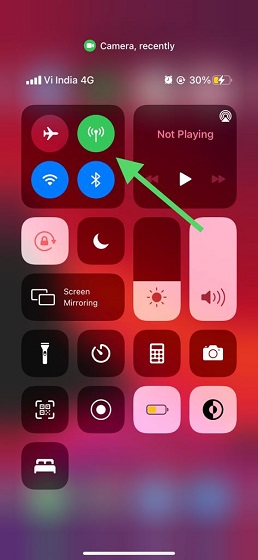
Bring Up the control center on your iPhone or iPad (swiping down from the top right corner of the screen on Face ID-equipped devices or swipe up from the bottom on Touch ID-equipped devices) and then tap on the Bluetooth and Wi-Fi icons to turn them off. Now, wait for some time and then turn them on. Also, try turning off/on Airplane Mode to reset connections. On your Mac, click on Wi-Fi and Bluetooth icons in the status bar and then turn them off. After that, wait for some time and then turn on both Wi-Fi and Bluetooth. Now, try AirDropping any file or image to check if the problem is gone.
Disable Personal Hotspot to Free Up the Bluetooth and Wi-Fi Connections
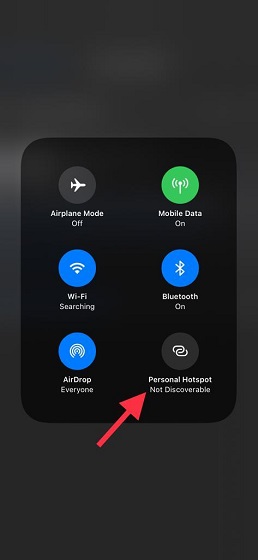
Another thing you should do without any failure is to make sure the personal hotspot is disabled on both devices. As it prevents Wi-Fi and Bluetooth from working normally, ensure that it is turned off. On your iPhone or iPad: Swipe up from the bottom or swipe down from the top right corner of the screen to bring the control center. Now, long-press the four-icon platter. Then, make sure the button for Personal Hotspot is turned off.
Disable Do Not Disturb Mode
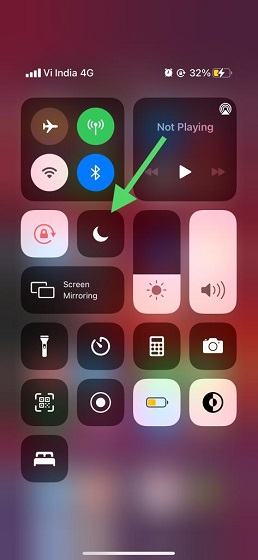
Be sure Do Not Disturb mode is not trying to block the path of AirDrop. Believe it or not, DND has the tendency of preventing AirDrop from working normally. So, turn off Do Not Disturb on both the devices and try to transfer files again.
On your iPhone and iPad with Face ID: Swipe down from the top right corner of the screen. Then, tap on the crescent moon icon to disable Do Not Disturb mode on your device. On your iPhone and iPad with Touch ID: Swipe up from the bottom to access Control Center and then hit the crescent moon icon to turn off DND. On Mac: When DND is enabled, a titled partial moon icon shows up in the menu. You can use this shortcut to quickly disable Do Not Disturb.
Force Quit the App and Try to Share Files Again
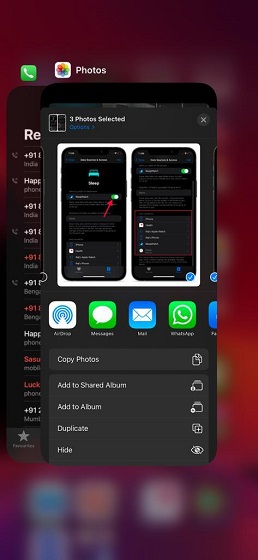
Many a time, I’m able to fix AirDrop issues on iOS or macOS by just force-quitting the app and starting the sharing process again. So, try out this simple yet effective trick to see if it solves the problem.
On your iPhone/iPad with Face ID: Swipe up from the home bar and then hold in the middle of the screen. After that, swipe up the app card to quit the app (which files you are trying to share). On your iPhone/iPad with Touch ID: Double press the Home button to bring up the app switcher and then swipe up on the app card to quit the app. On your Mac: Click on the Apple menu at the top left corner of the screen and choose Force Quit. Now, select the app which files you are trying to share. And then, hit Force Quit. Now, head into the app and select the files you want to share, and then hit the Share button. After that, select the contact/person with whom you want to share the files. If the files are sent/received swiftly, you are good to go.
Switch to Everyone to Prevent Any Chance of Contact Mismatch
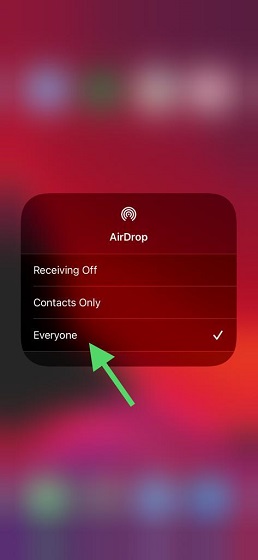
Both macOS and iOS allow sharing files between contacts only to prevent any foul play. While it’s a well-thought-out feature, at times it tends to create contacts mismatch. Therefore, ensure that your devices are discoverable by everyone. On your iPhone/iPad: Swipe down from the top right corner of the screen or swipe up from the bottom of the screen to access the control center. Then, touch and hold the four-icon platter at the top left corner to expand it. After that, tap on the AirDrop icon and choose Everyone.
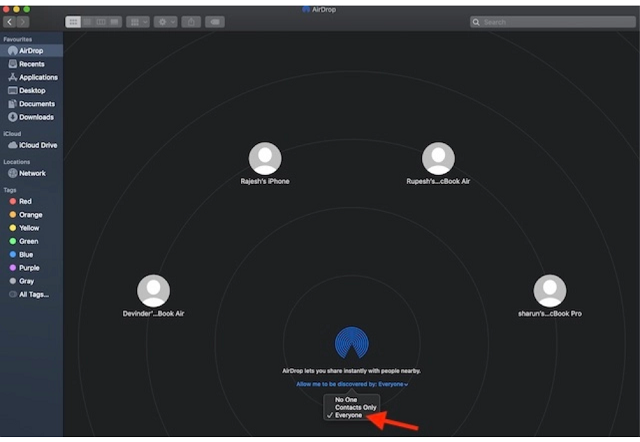
On Your Mac: Choose AirDrop in the sidebar of a Finder window. Alternately, you can also select Go -> AirDrop from the menu bar. After that, click on the drop-down arrow located right next to “Allow me to be discovered by and then select Everyone.
Reset Network Settings
If AirDrop is still not working on your iPhone or iPad, try resetting the network settings. If the problem is due to network-related issues, you can fix it by putting the network settings to factory default.
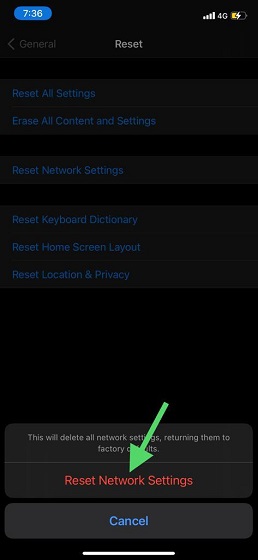
Go to Settings app on your iOS/iPadOS device -> General -> Reset -> Reset Network Settings. Then, enter your device passcode and tap on Reset Network Settings again to confirm the action.
Disable “Block All Incoming Communications”
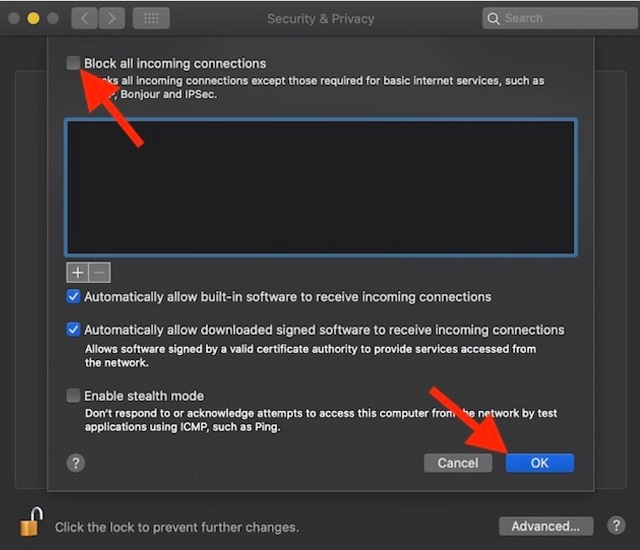
“Firewall” comes with a security feature that enables you to block all incoming communications except those needed for basic internet services such as Bonjour and IPSec. If you have turned it on, chances are pretty high that it’s playing the spoilsport by preventing AirDrop from working normally. Well, the good thing is you can turn off this security feature without having to disable the Firewall on your Mac. To do disable this security feature, click on the Apple menu at the top left corner of the screen and choose System Preferences. Next, click on Security & Privacy and choose the Firewall tab.
Next up, click on the lock and enter your administrator password. After that, click on Firewall Options and deselect “Block all incoming connections.”
Reset All Bluetooth Connections
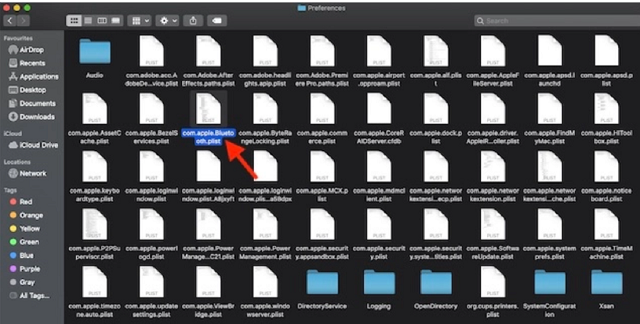
For smooth functioning, macOS stores all the known Bluetooth connections in a separate file. And when you eliminate the stored connections, Mac is forced to gather new Bluetooth connections. Whenever I face stubborn Bluetooth issues on Mac, I reset all Bluetooth connections. More often than not, it helps me solve Bluetooth-related problems. The reason why I’m suggesting you try this solution is that Bluetooth plays a key role in helping AirDrop work efficiently. If it is not working, AirDrop gets affected. To get going, click on the Bluetooth icon in the status bar and then turn off Bluetooth Off. Next, open the Finder window and choose the Go menu. Next up, select Go to Folder and then paste the mentioned path and hit Enter. /Library/Preferences/
Now, find the “com.apple.Bluetooth.plist” and delete it. After that, turn on Bluetooth and then try to share files using AirDrop.
Use Terminal Command to Kill Bluetooth
Terminal commands are super handy for not just unlocking a ton of hidden features but also troubleshooting complex issues. And guess what, there is a pretty reliable command for Bluetooth-related issues as well. So, just in case AirDrop is unable to work on your Mac running macOS Big Sur, you can use Terminal Command to kill Bluetooth, which will force Bluetooth connections to start afresh. In most cases, it resolves transfer and visibility issues of AirDrop. To do so, open the Terminal window and paste the following command. Now, enter your admin password and hit Enter. Next, allow the service to restart which will result in the removal of all the Bluetooth connections that are open.
Update Software on Your iPhone/iPad, and Mac
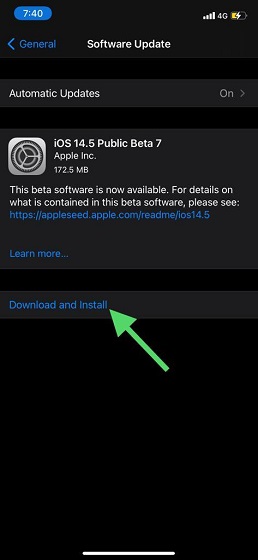
Software update often proves to be the right answer to random issues or the annoying bugs that most of us find hard to explain. As Apple keeps refining software with plenty of under the hood performance enhancements and bug fixes (it’s altogether another matter that bugs keep cropping up despite all the tireless efforts put in by the Cupertino), it’s better to upgrade the device to the latest software version rather than stay back to the outdated software. On iOS/iPadOS: Head into the Settings app and choose General. Now, tap on Software Update and then go through the usual process to download and install the latest version.
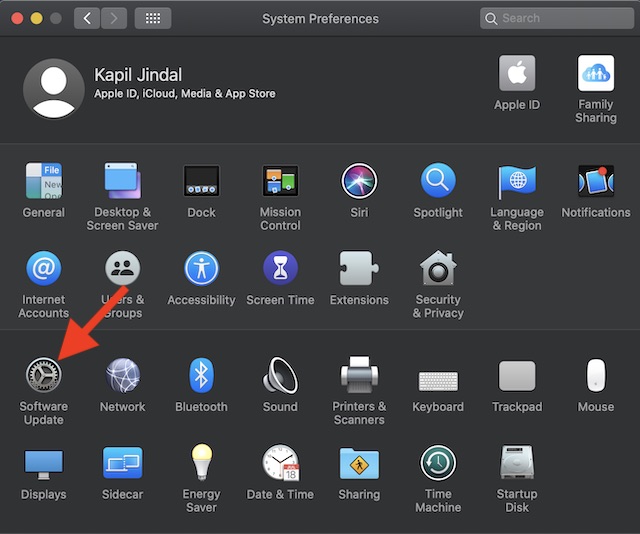
On macOS: Open System Preferences -> Software Update. Now, download and install the latest version of macOS.
After the software update, check if you have got the better of AirDrop issues.
Fixed! AirDrop Issues on iPhone, iPad, and Mac
So, that ends this guide about resolving AirDrop problems in iOS 14 and macOS Big Sur. I guess you have finally put the issues behind your back and started sharing files using AirDrop as seamlessly as ever before. Make sure to let me know the solutions that have worked for you in troubleshooting AirDrop. Besides, if you have any handy tip which you think is worth mentioning in this guide, be sure to send it across via the comments section below.
