Roll Back to Windows 10 From Windows 11 (2021)
Here, we have mentioned three ways to downgrade to Windows 10 from Windows 11. If you want to go back within 10 days of installing the preview build, the transition will be smoother with no issues. However, if the 10-day period has expired, you will have to install Windows 10 on your PC manually. So without further ado, let’s dive right in.
Downgrade to Windows 10 From Windows 11 Within 10 Days
If you have installed Windows 11 and don’t feel comfortable using the new UI, don’t fret, you can seamlessly downgrade to Windows 10. However, you must perform this action within 10 days of installing the Windows 11 preview build. After that, you will have to clean install Windows 10 manually, as I have mentioned below. In this process, none of your files or programs will be deleted. Also, Windows 10 will remain activated. Apart from that, make sure you have not touched the “Windows.old” folder in the C drive. It’s where all our old Windows 10 files are stored. Also, do not remove any of the temporary files from the Settings page as it will likely remove the old files.
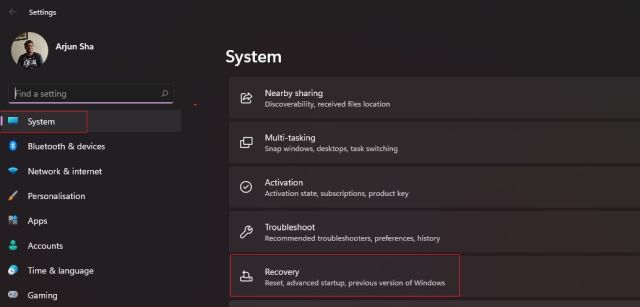
First off, open Settings and move to “Recovery” under the “System” menu. You can also directly search for “Recovery options” from the new Start on Windows 11.
Here, you will find the “Previous version of Windows” option. Click on the “Go back” button next to it.
A prompt will then appear on the screen, asking for the reason why you want to roll back to Windows 10 from Windows 11. Select one of the options and click on “Next“.
After that, click on “No, thanks“.
Now, read the instructions and click on “Next” a couple of times to proceed further.
Finally, you will get the “Go back to earlier build” option. Click on it. Your PC will now restart, and the downgrade process to Windows 10 from Windows 11 will begin. Keep in mind this process will take anywhere between 1-2 hours depending on your PC’s specs, so keep patience.
Once the downgrade is complete, you will boot back to Windows 10 with all your files, programs, and license key intact.
Go Back to Windows 10 From Windows 11 After 10 Days
You can go back to Windows 10 from Windows 11 even after 10 days, but you need to perform this action before the 10-day period expires. If the 10-day period has expired, Windows 11 will permanently delete the “Windows.old” folder, and you won’t be able to switch back through a seamless process. You can also use this method to extend the uninstallation period.
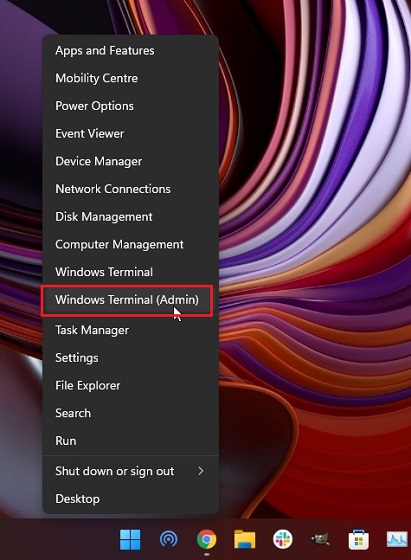
If you are within the 10-day period, open Command Prompt or Windows Terminal and run it as an administrator. You can use the Windows keyboard shortcut Win+X, followed by the ‘A’ key to open Command Prompt with administrator privileges.
Next, run the below command to check the current uninstallation window. It should say 10 days. If you get a “No element found” error, then sadly, your PC is no longer eligible to roll back to Windows 10 from Windows 11. You can clean install Windows 10 using the steps described in the below section.
After that, run the below command to extend the uninstallation window from 10 days to 60 days. You can change the value from anywhere between 10 to 60 days.
Now, you will be able to go back to Windows 10 from Windows 11 even after 10 days. Keep in mind the maximum rollback period is 60 days. So if you decide to move back to Windows 10, remember to do it within this 2-month period.
Roll Back to Windows 10 from Windows 11 (Manual Installation)
This method comes into play if you are past the 10-days (or up to 60-days) rollback window. Also, if you deleted the “Windows.old” folder to free up space or used Storage Sense to remove temporary files, you can’t downgrade to Windows 10 with everything intact. You will need to clean install Windows 10, and this will remove all your programs and files within the C drive (Desktop, My Documents, etc.). Note that Windows 10 will be activated automatically, so you don’t need to worry about that. Also, files or folders from all other partitions will remain untouched. But if you have any valuable or personal files stored on your PC, we strongly suggest you back them up.
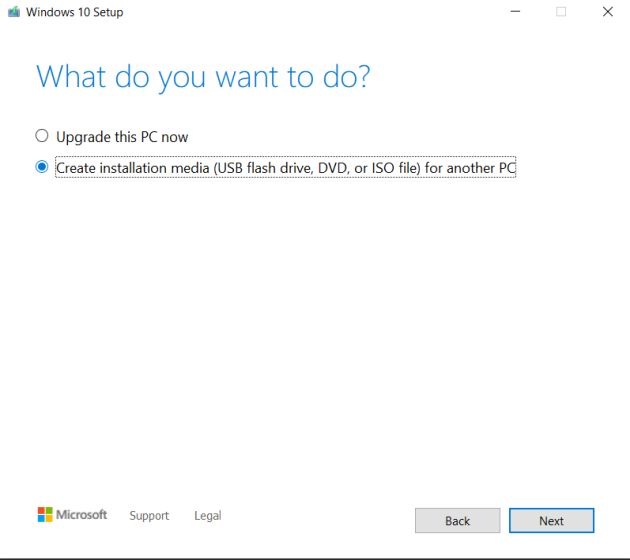
For a clean installation, I recommend you use the Windows 10 Media Creation Tool. It’s an official tool by Microsoft for installing the latest and stable version of Windows 10 on your PC manually. Go through the guide linked above and follow the “Create Windows 10 Bootable USB Drive” section.
Once the bootable USB stick is ready, restart your computer, and while the computer boots up, start pressing the boot key continuously. From the boot screen, select the thumb drive and hit enter. Note: On HP laptops, pressing the “F9” key during startup brings up the Boot Options menu. For other laptops and desktops, you will have to look up the boot key on the Internet. It should be one of these: F12, F9, F10, etc.
You will now boot into the Windows 10 installer setup. Now follow this instruction path, click on “Next -> Install Now -> I don’t have a product key -> Custom”.
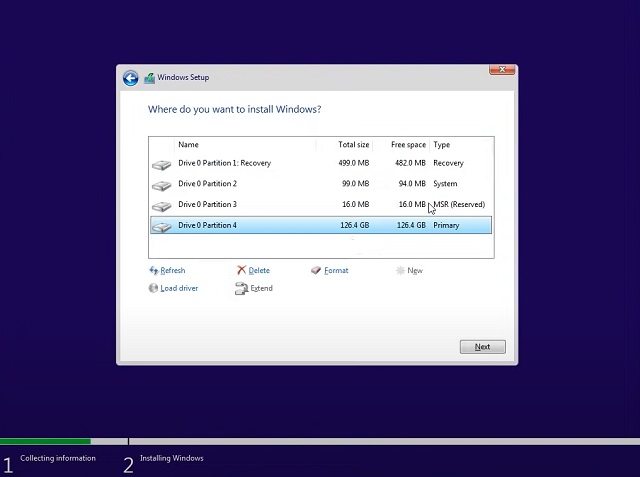
Now, identify the “C” drive partition based on the drive size and click on “Next” to install Windows 10 on your PC. This will only wipe your C drive (including programs and files from Desktop, My Documents, Downloads — all within C drive). And all your other partitions will remain untouched.
After the installation process is complete, your PC will reboot. Now, you can remove the USB thumb drive, and you have downgraded to Windows 10 from Windows 11. So that’s it.
Uninstall Windows 11 and Move Back to Windows 10 Instantly
