Everything You Need to Know About TPM & Why Windows 11 Needs It (2021)
If you used the free tool that tells you why your PC can’t run Windows 11 and TPM is found to be one of the limitations, this in-depth guide will help you understand the security chip in detail.
What is TPM and What Is Its Use?
In basic terms, TPM (Trusted Platform Module) is a hardware chip that’s responsible for protecting your PC from ransomware or any other kind of hacks and malware. It’s a cryptoprocessor that holds keys to sensitive information, including your PC’s PIN or password, Windows Hello authentication data, encryption keys for Bitlocker, security-critical keys, and more. Since it’s a hardware-based module, it’s impossible for malware to manipulate it through traditional software methods. Hence, the TPM chip becomes an elevated, hardware-based “root-of-trust” that the OS can always trust. A TPM Chip To give a parallel example in the Android world, Google Pixel phones come with the Titan M security chip that verifies the firmware and checks if it’s tampered with before booting the device. Apart from that, the Titan M chip also protects your payment information, lock-screen passcode, and other sensitive information. Samsung also adds a separate Knox chip that does hardware-based authentication for passwords, payments, confidential files, etc. All this shows that hardware-based protection is the way to go, and Microsoft is right in including the TPM requirement for Windows 11.
Why is TPM Essential for Windows 11?
There is no denying the fact that Windows computers are favorite among hackers and sophisticated attackers. It’s largely because of how easy it’s to install programs from the web or automate a script on Windows that ends up infecting the whole system. Remote execution is another favorite method of hackers to exploit a vulnerable PC. Gone are the days when low-threat viruses blocked Task Manager, and you would have to run an antivirus program to make things right again.
According to Microsoft, 83% of attacks that businesses experienced in the past two years were “firmware attacks“. Firmware attack means an exploit that attacks the firmware of the motherboard itself, taking control of hardware components, altering the boot process, and making code injection a simple execution. The main purpose of a firmware attack is to steal sensitive information like your Windows Hello fingerprint/facial data, bank details, Microsoft credentials, encryption keys, among other things. The threat level of firmware attacks is very high. Hence, TPM is required to protect your sensitive information on Windows 11. The attacks have gotten so sophisticated that even TPM failed to guard cryptographic keys against the recent Spectre and Meltdown vulnerabilities. So it’s only natural for Microsoft to make a secure, hardware-based authentication system so that users remain on the safe side as we move forward.
Which Processors Have Built-in TPM Support?
The TPM module generally comes built-in with the CPU, but for custom-built PCs, you will find a TPM header on the motherboard where you can attach a compatible TPM module. At least since 2014, almost all the processors have come with the TPM module onboard. Intel started integrating TPM on its chips with the Haswell architecture (2013, 4th-Gen) except for the K-series, which got the integrated Trusted Platform Module with 6th-Gen (2015).
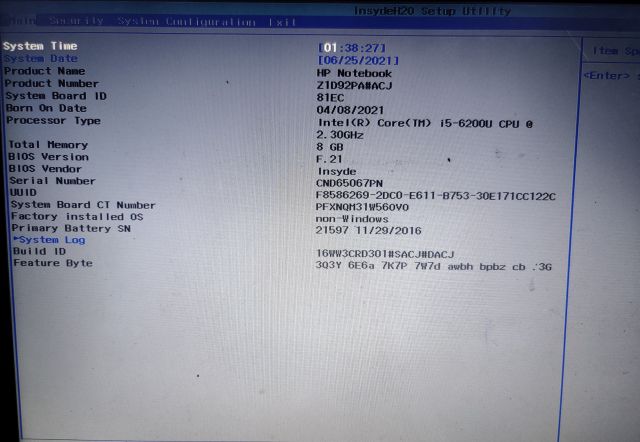
So I would assume, Intel-powered Windows PCs after 2014 do have support for either TPM 1.2 or 2.0. You need to enable it from the BIOS/ UEFI menu. To give you an example, I have a 6th-gen Intel i5 processor, and TPM 2.0 is available on my PC. I just had to enable it from the BIOS. And if you are wondering, do AMD processors support TPM as well? Well, the answer is yes. The TPM security chip is integrated right into the CPU from Ryzen 2500 (2017) and onwards. Below, you can find out the steps for how to enable TPM on your Windows 10 PC.
How to Enable TPM in BIOS/ UEFI to Run Windows 11?
First, you need to boot into the BIOS or UEFI interface of your PC. You can do this by pressing the boot key continuously while your computer starts up. Note: For HP laptops, it’s the “Esc” or “F10” key. As for other laptops and desktops, the boot key may differ. So make sure to search for the specific boot key for your computer from the internet. If you are using a custom-built desktop, the boot key depends on the motherboard manufacturer. It would be one of these – F12, F9, F10, etc.
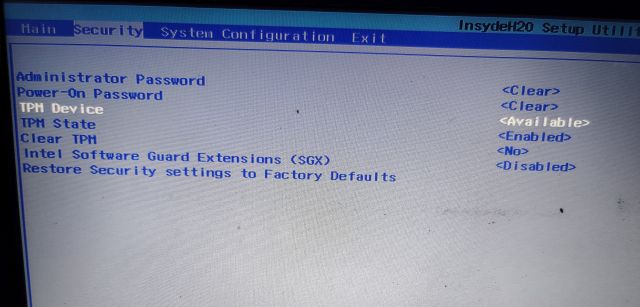
Once you are in the BIOS/ UEFI interface, look for something called “TPM” or Trusted Platform Technology. It’s also called PTT (Platform Trust Technology) on some Intel-based machines. On AMD machines, you might find the “PSP”, “fTPM”, or “PTP” option in the BIOS menu. Look around, jump into the Advanced Settings and make sure it’s enabled or available. There might be TPM State as well, so go ahead and enable it.
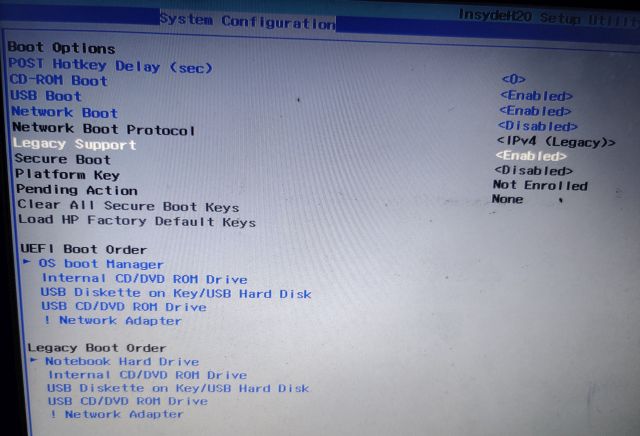
Next, find the “Secure Boot” option under different menus and enable it. If the Secure Boot option is greyed out, you need to set a password in BIOS. Some laptops don’t allow you to enable Secure Boot unless you set a “Supervisor” or “Administrator” password. So set the password first, and then you can enable Secure Boot. Needless to say, you need to remember the password, else you will be locked out of your computer and won’t be able to access the BIOS.
Now, press “F10” and hit enter to save and exit. F10 is generally reserved for “Save and exit”, but the key may differ for your computer. We suggest you check it on the BIOS/ UEFI footnote.
How to Check if Your Windows 10 PC Has a TPM Module?
Method 1: Using TPM Manager
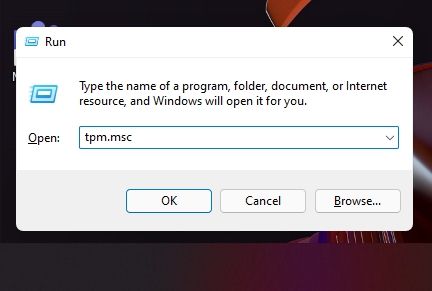
Once you have enabled TPM in the BIOS/ UEFI menu, just use the “Windows + R” keyboard shortcut to open the Run window. Here, type tpm.msc and hit enter.
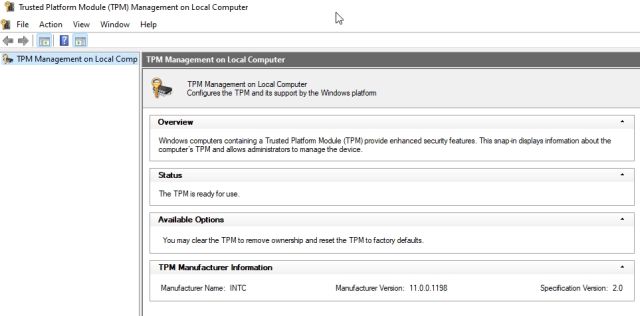
A new window will open up. Here, under “Status“, check if the TPM chip is available or not. Right below, you can also find the TPM version.
Method 2: Using Device Manager
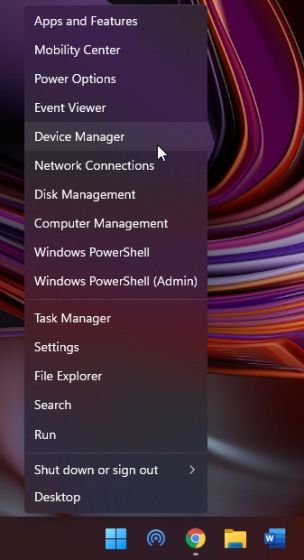
Another way is to check TPM availability through Device Manager. Press the “Windows + X” shortcut and open “Device Manager“.
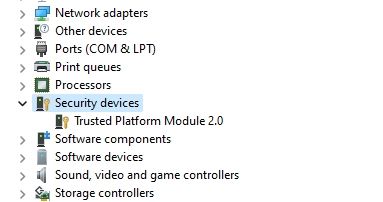
Here, expand the “Security devices” menu, and you will find TPM along with the version information.
Method 3: Using Windows Settings
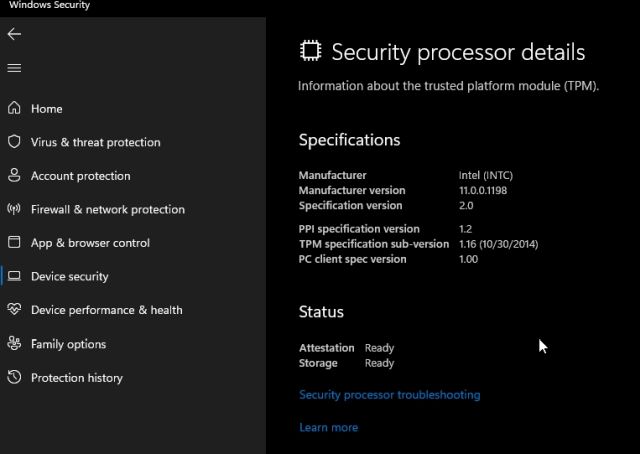
Finally, there is one more way to check the TPM module on your Windows 10 PC. Open “Windows Security” and move to the “Device Security” tab. Here, click on “Security processor” details, and you will find all the information regarding the TPM chip on your computer.
Can We Add TPM Module To Laptop/ Desktop Motherboard?
As I have mentioned above, if you bought a laptop in the last 5 to 6 years, your laptop likely comes with the TPM module. All you need to do is enable it from the BIOS. In case your laptop is running an older CPU, then sadly, you can’t add a TPM chip since laptop motherboards don’t come with a TPM header. Plus, Microsoft will allow certain OEMs to bypass the TPM requirement for commercial purposes. Image: Rainer Knäpper, Free Art License On the other hand, if you own a custom-built desktop PC, you can very well add a TPM security chip to the motherboard. Most motherboards come with the required TPM header (TPM imprinted next to it), so you are good to go. That said, make sure to check the compatibility of the chip with your motherboard while buying the module. Apart from that, currently, the TPM chip is nowhere to be found because of the sudden surge in demand. I won’t recommend you to pay an exorbitant price to buy a TPM chip. You should wait for the prices to come down.
Advantages and Disadvantages of TPM
As I have discussed above, the advantages of enabling TPM are that it brings overall safety, security to your sensitive information, and integrity to the OS. Here, let’s take a look at what are the disadvantages of this security chip. For general users, let me clarify that TPM won’t stop malware and other kinds of sophisticated attacks on your PC. But what it does is that it blocks malwares from stealing your most private and confidential data. In that sense, TPM is not a one-stop solution for safety and security on Windows. You will still need to be careful while dealing with files downloaded from the web. Coming to the technical aspect, people who usually dual-boot Windows and Linux might face some issues. While TPM support (known as TCG on Linux) has been added to Linux since version 3.20, there have been some driver issues. You need to separately check your Linux distro and how it plays with the TPM chip. Otherwise, there are not many issues you are going to face with the TPM chip enabled on Windows 11.
Enable TPM to Protect Your Windows Computer
So that is a broad explanation of TPM and why Microsoft has decided to make it mandatory for Windows 11. I think it’s a well-thought-out move as we move to the next decade of computing. Android, iOS, macOS, and Linux have gotten pretty secure, and it’s now time for Windows to have the same level of security. In case you are facing the “PC can’t run Windows 11” error due to an unsupported CPU, I will still recommend you to enable TPM as a good security measure, so that your data is protected even on Windows 10. So that is all from us. If you have any questions, let us know in the comment section below.


